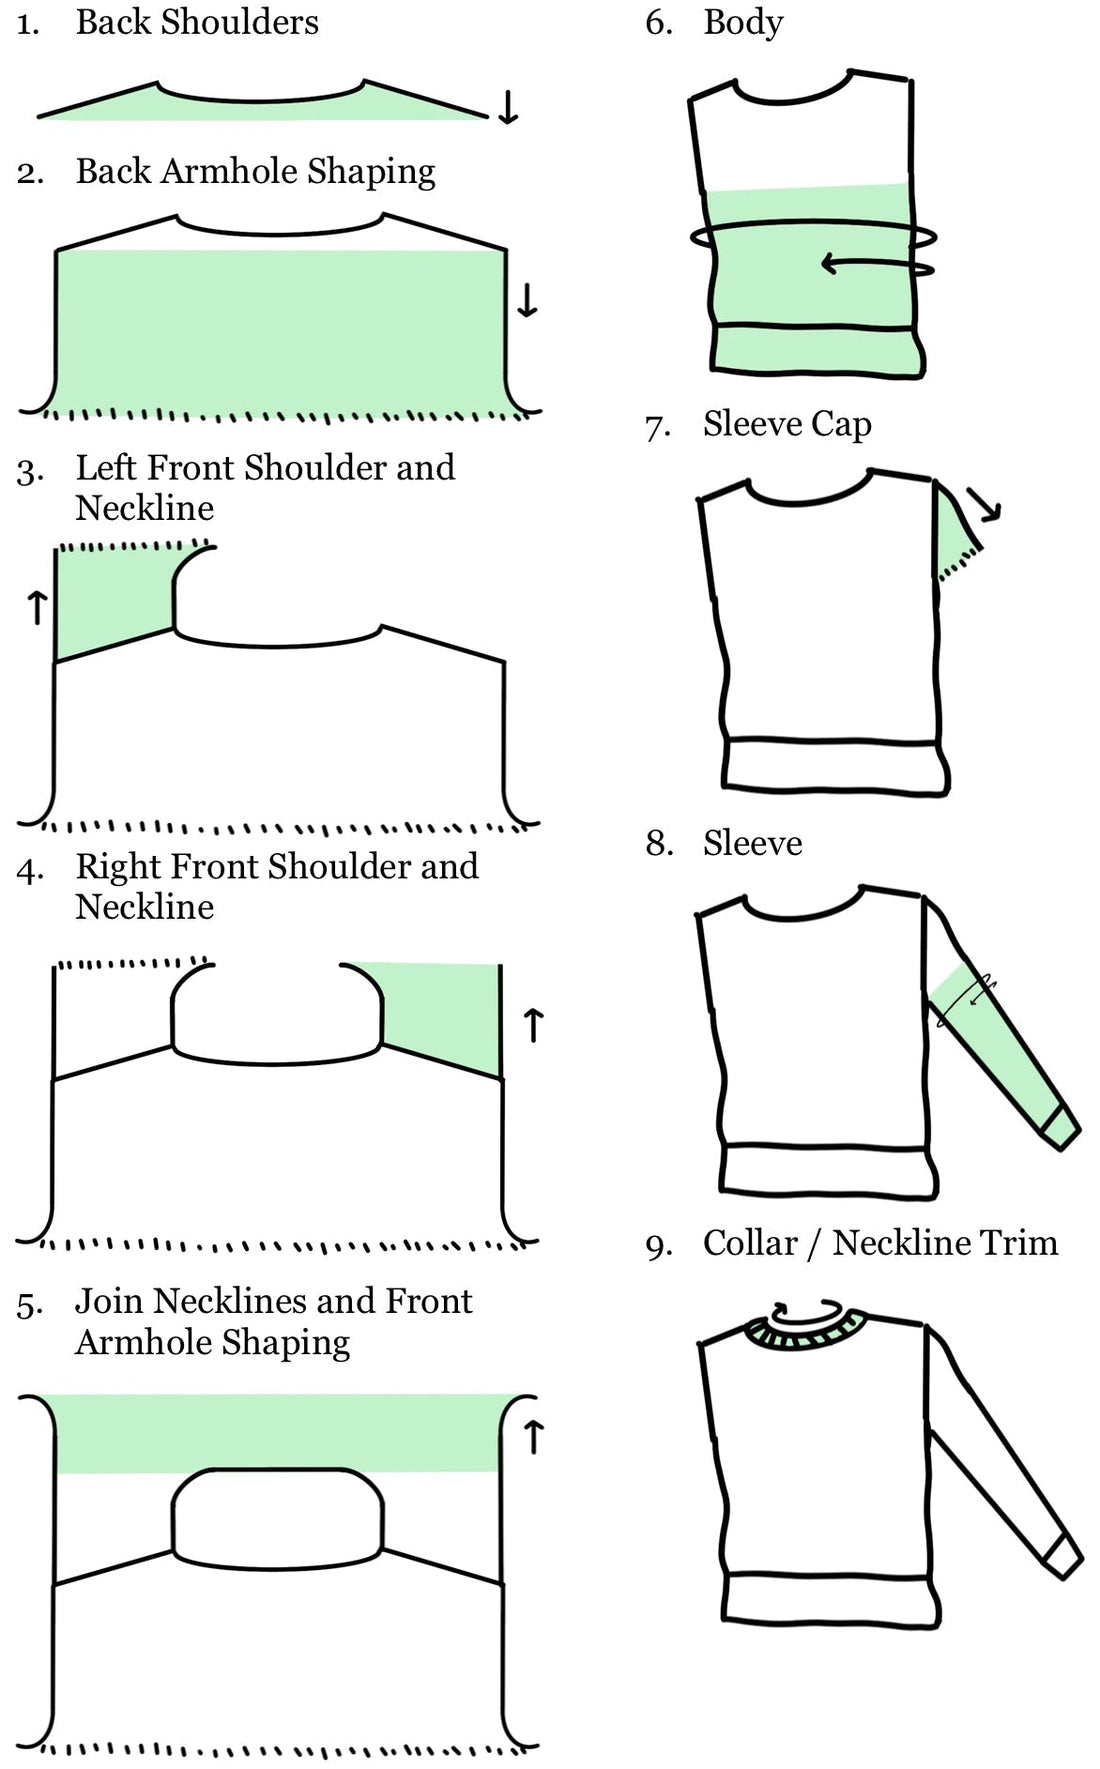
This diagram depicts a standard top down set-in sleeve with a short row sleeve cap. Arrows indicate the direction of knitting.
This is one of my absolute favorite construction methods. It’s very precise and customizable to many different body types, plus I love how polished it looks. It uses short rows to shape the back neckline and shoulders, the front shoulders, and the sleeve cap.
1. Back Shoulders. Generally the amount of stitches for the desired cross shoulder measurement is cast on. At this point short rows are worked to mimic the shoulder slope. I usually go for about 1” / 2.5 cm of short rows. I also prefer to work back neck shaping at the same time (image shows this curve at the back neckline). Instead of working short rows across the entire back (like a trapezoid), work the right shoulder first, and then the left.
2. Back Armhole Shaping. The piece is worked straight, and then the armholes are increased on either side of the back. A rule of thumb I follow is to limit the shaping to the lower 1/3 to 2/3 of the armhole.
3. Left Front Shoulder and Neckline. Stitches are picked up for the left front, short rows are worked to shape the shoulder, and then the piece is worked straight for a bit. The right side is then increased for the neckline. The short rows add depth to the front neckline without adding depth to the armscye, and works really well paired with the back short rows. For a crew neck I like to have the front neck depth at least 4” / 10 cm deep. Once the neckline increases are complete these stitches are placed on hold.
4. Right Front Shoulder and Neckline. Stitches are picked up for the right front shoulder, and it is worked as the mirror of the left front.
5. Join Necklines and Front Armhole Shaping. Next, work across the right front, cast on stitches for the center front, and work across the left front to join the two fronts.
Note that I worked the left front first and then the right front because I like to end those on wrong side rows, and then join on a right side row. If you wanted to join on a wrong side row you would work the right front first, and then the left front, ending the neckline shaping on both on right side rows.
Work straight and then work the armhole shaping. It’s very common in knitwear for the front armhole shaping to be identical to the back armhole shaping, and for the armhole depths to be the same. If like many of us your back is a bit curved or you have a dowagers hump, you may find better fit by having the back armhole depth be slightly longer than the front one.
6. Body. I like to block the piece while it’s flat. Then it’s time to cast on stitches for the underarms and join in the round. The body is then continued in the round. This construction is better suited to a fitted silhouette. If you want a lot of positive ease I highly recommend adding that extra width after joining in the round, with something like vertical bust darts. The bust tends to sit below the underarm, adding the shaping for it below the underarm more closely reflects our body shapes, and prevents excess fabric at the underarm.
7. Sleeve Cap. This is what sets this construction apart from other constructions. Short rows are used to shape the top of the sleeve and help it curve down towards the natural angle of our arms. A sleeve worked straight from the armhole without a sleeve cap would give the sweater a T shape. You can probably imagine how that might tug awkwardly. See below for a deeper dive into how this is shaped.
8. Sleeves. Once the sleeve cap is finished the sleeve is worked in the round.
9. Collar / Neckline Trim. Finally, stitches are picked up around the neckline and the collar is worked.
Shaping the Sleeve Cap

Illustration shows the set up and execution of a sleeve cap. It is worked flat. The ovalish shape represents the armhole.
1. Pick Up Around Armhole. Most commonly the pick up is started in the center of the underarm cast on. This does result in the left side of the sleeve cap having one more row before the short rows than the right side. It’s usually not very noticeable, but you could eliminate this by starting the pick up at the left edge of the top of the sleeve cap (the black lines in images 2 and 3 illustrate the top of the sleeve cap). I did this in the Chainmail Blouse because it would have been very noticeable in that stitch pattern.
2. Knit Across Sleeve Cap. A big design decision is how wide to make the top of the sleeve cap. Generally, the wider the top of the sleeve cap is, the shallower the sleeve cap becomes. In this step you are knitting to where you want the top of the sleeve cap to end, and then turning.
3. Start the Short Rows. I like German short rows, but you can use your preferred method. At the start of this purl row I would make a double stitch, and then purl across to the left side of the top of the sleeve cap. At this point the top of the sleeve cap has been worked, and the sleeve cap set-up is complete.
4. Work the Short Rows. The most common method is to work 1 stitch past each double stitch and then turn, until the sleeve cap has reached your desired length. While this method works, it may not always give the best fit, especially on the extremes of the size range. Nowadays I prefer to set the sleeve cap height, grade it similarly to the armhole depth, and use 2 shaping rates to use all the stitches to the underarm CO. Many sources will recommend ending the short rows when about 1/3 of the armhole height remains (which also tends to coincide with where the armhole shaping starts). I prefer the short rows to end next to the underarm cast on, I’ve found it results in better fit.
A shorter sleeve cap will result in the sleeves sticking out at a more perpendicular angle from the shoulders. A longer sleeve cap will result in a sleeve that runs more parallel to the body.
Key Fit Points
I recommend checking bust and bicep measurements for all constructions. These are fit points that I find important to this particular construction.
Cross Shoulder- Aim for close to the actual body measurement.
The garment’s cross shoulder measurement should be somewhere between the body’s cross front and cross shoulder measurement. Choosing a narrower measurement results in a very fitted look. Going for a wider measurement gives more of an 80s power shoulder vibe. If the measurement is too wide it will result in a drop shoulder garment.
Armscye Depth- This affects how many stitches can be picked up for the sleeve, and if it’s comfortable to wear.
Armhole depth tends to be a personal preference, but in general armholes that are too shallow feel constricting and tight. Similarly armholes that are too deep can actually limit the arm’s range of movement. In a set-in sleeve I like to have the armhole depth be proportional to the bicep circumference. For example, I might make a slightly shallower armhole depth for a close fitting sleeve, or a deeper armhole for a sleeve with more positive ease. I do this so that the ratio of stitches picked up for the amount of rows doesn’t result in gaping or puckering.
Sleeve Cap Width- Affects the final sleeve shape.
If you’re going for a puff sleeve, you may want to start with a slightly narrower sleeve cap and then increase on the first row to add volume. For a drop shoulder on the other hand, you might want to make a wider sleeve cap, to smooth out the curve of what is likely to be a shallower sleeve cap.
Tips for Designing Your Own
1. Decide on the garment measurements before casting on. In addition to determining cross shoulder width, sleeve cap width, and underarm cast on width, decide how much ease you want at the full bust and bicep, and how deep you want the armhole to be. Use those measurements to figure out how much you need to increase for the armhole shaping.
E.g. You want the circumference at the underarm level of the sweater to be 200 stitches, and have decided that you will cast on 15 stitches for each underarm. That leaves 170 stitches for the body, divide that by 2 to get 85 stitches that you need to the front and the back respectively at the underarm level. If you chose to have the cross shoulder be 71 stitches, 85-71=14, so you would need to increase 14 stitches in the front and 14 stitches in the back. As each increase row will increase 2 stitches, one at each underarm, a total of 7 increase rows will need to be worked for the underarm shaping.
2. Round your target measurements for the bust and bicep to the nearest multiple of 4. Even in a stockinette sweater this helps all the math work out more easily. Plus, it helps with having the right stitch counts for the most common types of trim. I like to use odd numbers for my back neck measurement, and often for the underarm cast ons, because I find it easier to center motifs and trim that way. Of course if the motifs are worked over an even number of stitches, you’ll want to use and even number of back neck sts.
3. The slope of our shoulders is steeper close to the neck, and shallower near the shoulder tip. When calculating short rows you’ll usually end up with 2 rates, one slightly longer than the other. Place the shorter ones closer to the neck. This article by Sister Mountain is great for calculating short rows.
4. Subtract the back neck stitches from the total cross shoulder stitches, and divide that number by 2 to find out how many stitches you have per shoulder. This is how many stitches you should pick up for each front, and how many stitches the short rows should be worked over. If you’d like to work back neck shaping at the same time as the back short rows this is the point where the the shaping for the back neck begins on either side.
E.g. You’ve determined that you want 71 stitches for the cross shoulder, and 27 for the back neck. That leaves 44 stitches for the shoulders, 22 stitches for each. (71-27)/2= 22