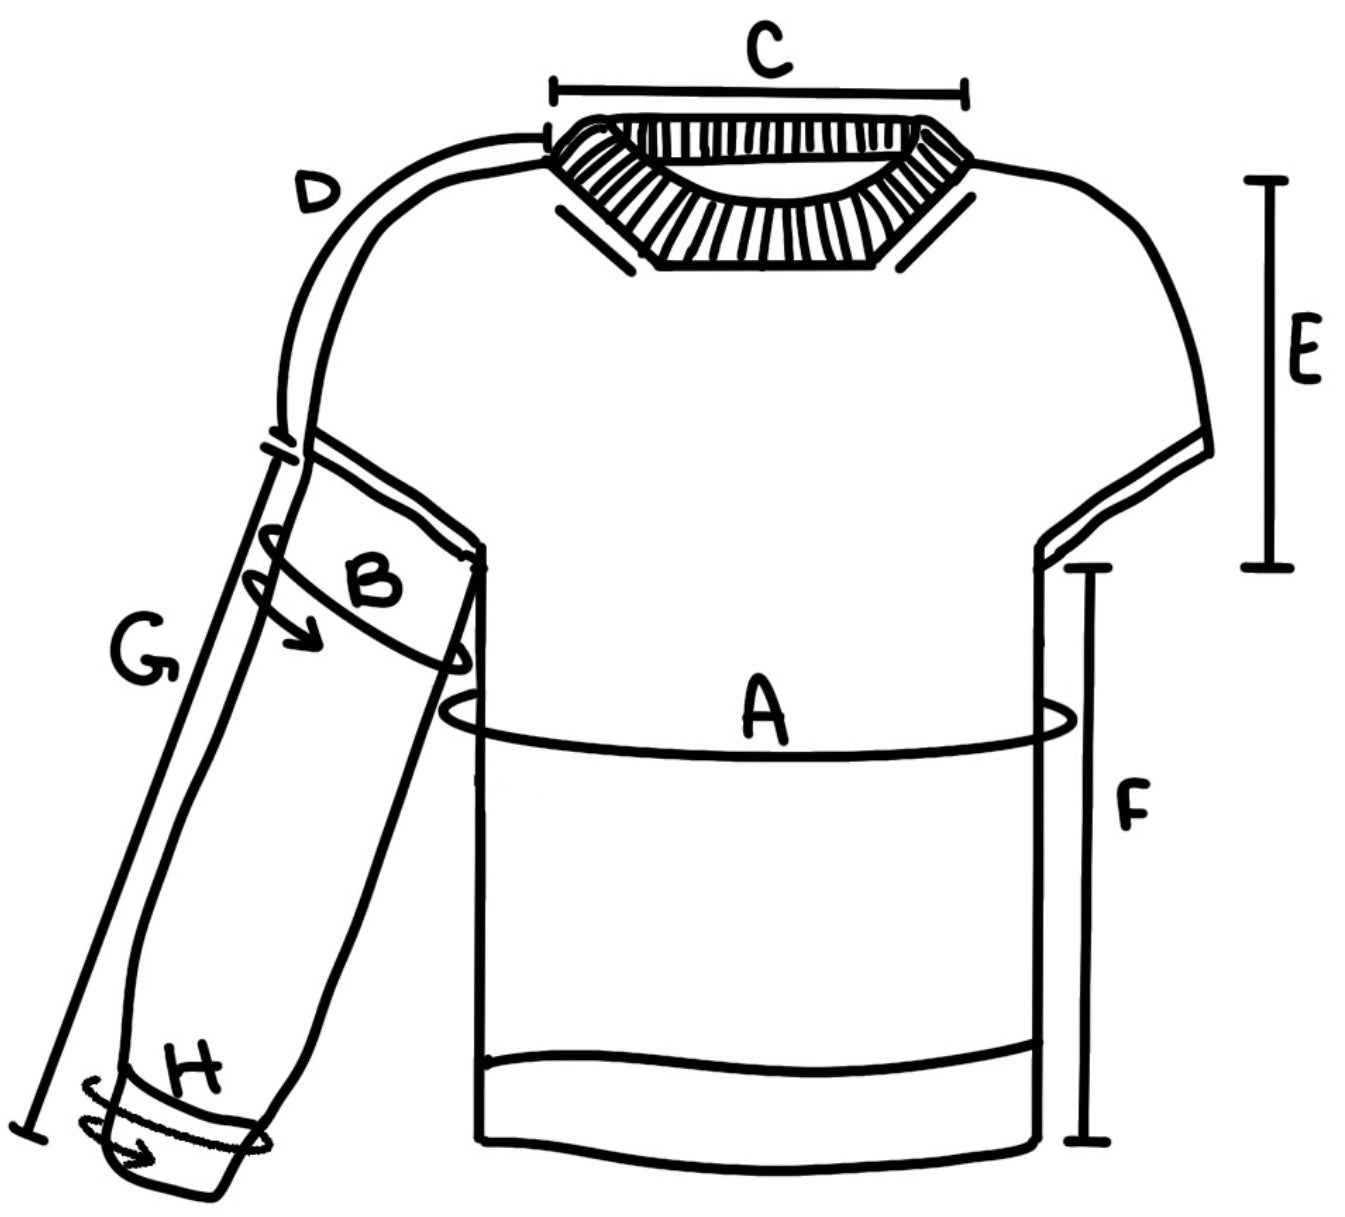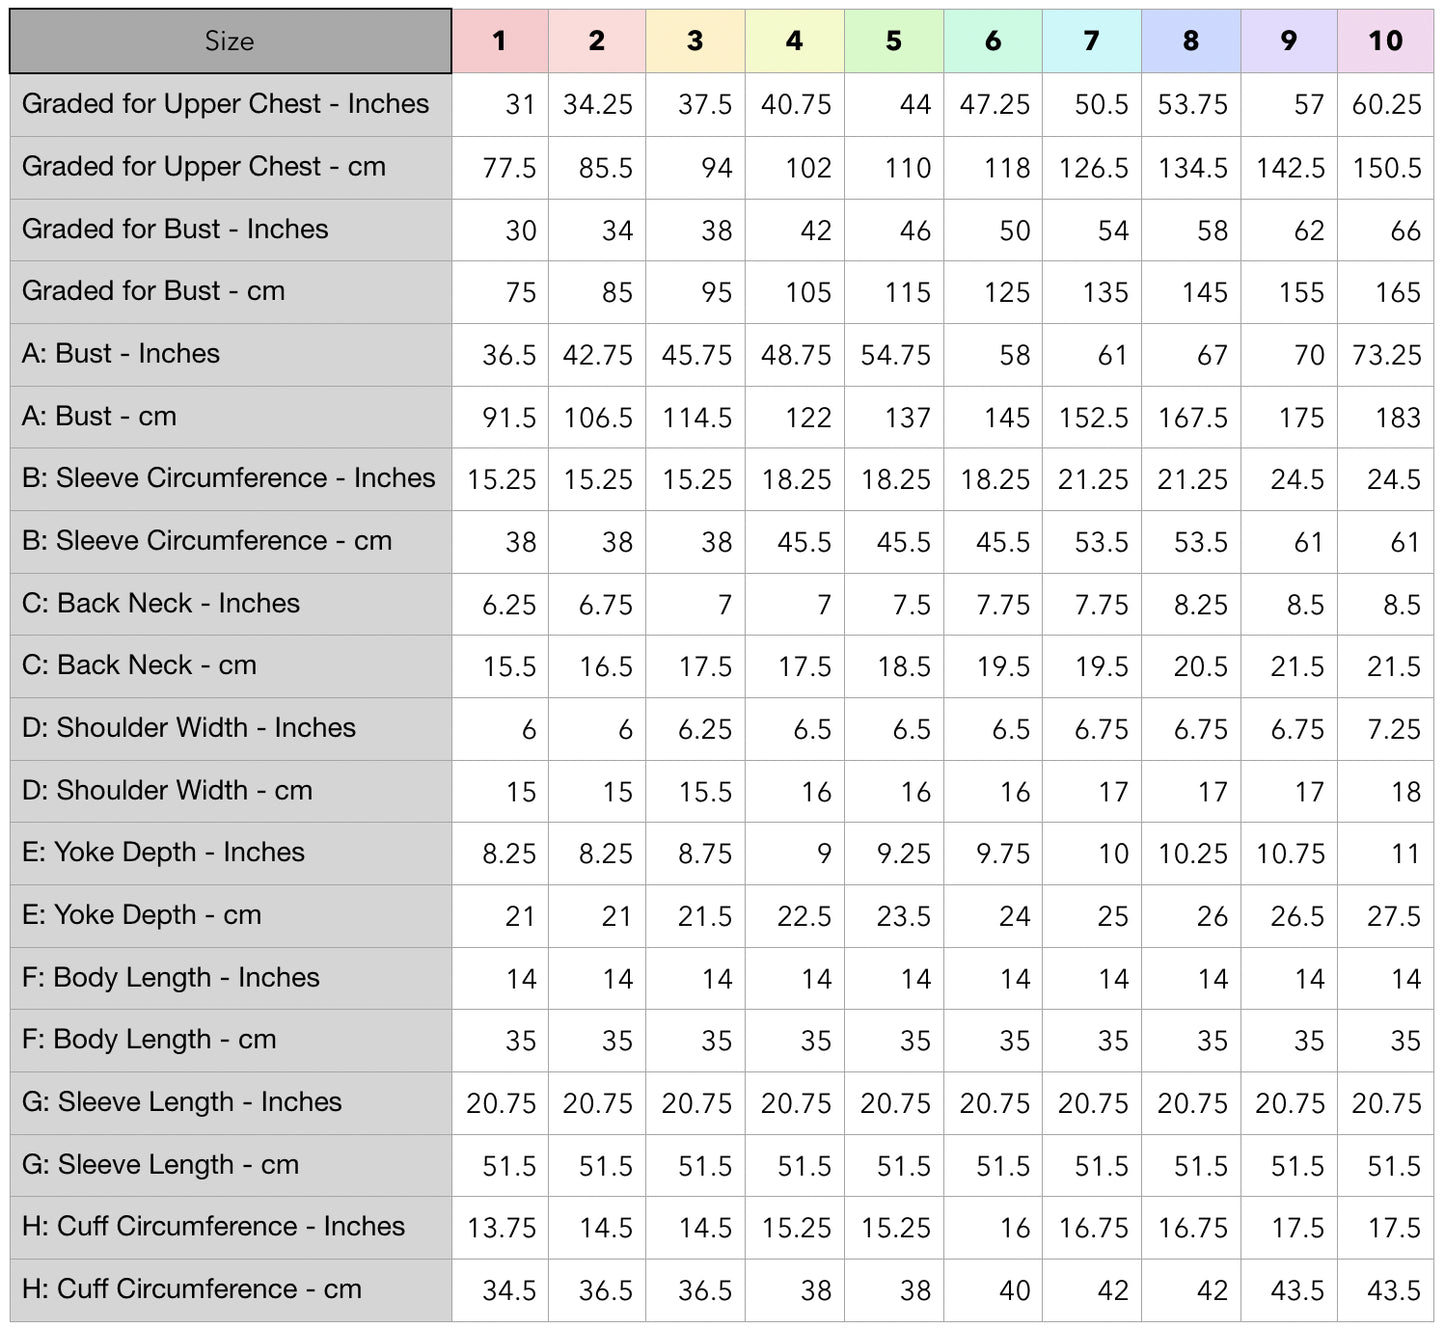


Here’s the schematic for my Little Crystals pullover, as well as the corresponding size chart.
At the top of the size chart is a list of the sizes, each with its own color, and column of measurements.
In my size charts, the first 2 measurement rows are not finished garment measurements. Instead they indicate the upper chest (a much better indicator of upper torso measurements) and full bust measurements that each size is graded to fit. I do this to simplify choosing a size, no math needed. But, you’re here to dive deeper, so let’s do it.
A-H are the finished garment measurements, provided you get gauge. Let’s walk through each measurement and how it can be modified.
A: Bust - Most commonly the final circumference of the garment at full bust level. In Little Crystals this is graded with 6-8” / 15-20 cm of positive ease.
You’ll notice there are no other body circumference measurements in this schematic, meaning that the body has no shaping. Adding waist shaping or hip shaping (as described belbow) is a fairly simple modification, with great results. Little Crystals includes guidance on how to implement this in the pattern.
How to Modify: Say you’ve chosen size 5 based on your 44” / 110 cm upper chest, but your full bust measurement is 50”. Your full bust is 4” / 10 cm larger than the size chart assumes, and without making modifications you will end up with 4.75” / 12 cm of positive ease at the full bust, instead of what is recommended. I highly recommend adding the optional bust darts if this is the case, they will not add width, but will add length and more fabric for better fit.
In most patterns you could also add increases to accommodate your bust after casting on for the underarms. I think this a great way to go if you are apple or pear shaped, and will want more fabric for the remainder of your lower torso as well. In Little Crystals I would recommend adding extra width in the lice section after the large motif, as it could be a hassle making sure the motifs are still centered when altering right at the underarm. I think this is a particularly good option if your belly is larger than your bust.
Alternatively, you could choose to have slightly less positive ease at the fullest part of your bust, and work the pattern as written. If you commonly end up with a lot of extra fabric around your waist and hips because you’re busty and have chosen a size based on your full bust measurement, this might be a better solution.
B: Sleeve Circumference - AKA, bicep circumference. It’s not uncommon for bicep circumference to have very little to do with our bust or upper chest circumference. There are designers who tend to design very tight biceps, and designers who choose to allow for more room in the sleeve. As a knitter, this is a good measurement to check and compare to your own body and preferences.
Little Crystals has a roomy oversized sleeve, graded with 4.5” / 11.5 cm of positive ease. A few sizes share bicep circumferences because the large motif is uninterrupted.
How to Modify: In constructions that call for picking up and knitting stitches around the armhole, a quick and dirty modification is to simply pick up more or fewer stitches. Generally, I would recommend also adjusting the scye depth so the pick up rate isn’t altered too much.
In this case, that’s hard to do. You could potentially pick up the number of stitches called for in a neighboring size, but I would instead recommend changing the shaping after the large motif. For example, sizes 1, 2, and 3 all share a bicep circumference, but size 1 has a different cuff circumference. So if you’re knitting size 2 or 3 you could pick up stitches as described for your size, but then work the size 1 shaping in the forearm section. You could also add additional shaping (which several test knitters did).
C: Back Neck width - How wide the neckline is graded to be for each size. Note that the weight of the sleeves will impact the final fit. You can compare this to your own back neck measurement to see how far it will sit from your actual neck. Take half the difference between the garment and your body to see how far away it will sit from your neck on each side.
D: Shoulder Width - This is how wide each individual shoulder is, from where it joins the collar to where it meets the sleeve. In a drop shoulder style like this it’s a useful measurement to see how much the garment will actually drop on your body. It’s a key fit point of the Little Crystals pullover.
If you’re not sure where the collar will sit on you, double the Shoulder Width and add the Back Neck measurement. That gives you the total width of the garment across the shoulders. You can then compare that to your cross shoulder measurement. Divide the difference by 2 to see how much it will drop. Take into account that the weight of the sleeves may pull this down a bit more.
How to Modify: If this didn’t have all over colorwork you could add or remove shoulder increases to get to your desired width, then pick up the adjusted amount of stitches for the fronts as well. You would then need to add additional shaping to get to the correct stitch count before joining in the round.
Instead, you might want to consider going up or down a size to get the look you want. One of my test knitters’ upper torso and bust put her between a size 1 and 2, but she climbs and has very defined trapezius muscles. In the past this has prevented drop shoulder garments from dropping as intended. She sized up to size 3, and the extra ease at the bust is barely noticeable. The lack of drop would have been.
E: Yoke Depth - How deep the yoke is. This corresponds to armscye depth in set-in sleeve garments. In Little Crystals the front is longer than the back, so this is the average of the two, accounting for the fact that the shoulder ‘seam’ sits towards the back.
How to Modify: In many constructions there will be sections before the armhole shaping where the piece is worked straight, you can add or remove rows there to lengthen or shorten it.
F: Body Length - This is how long the body measures, including the hem, below the underarms. Some patterns will list a total body length instead, measured from the center back neck to the hem. As scye depths differ from pattern to pattern, the total body length is a good measurement for comparing patterns. For example, if you have a sweater that you love the length of, measure the total body length for reference. If you simply knit the body of the new sweater to the same length that you knit that sweater, it may not end up the same length if the scye depths (and shoulder shaping) are not the same.
Calculating total body length when it’s not in the schematic: Sometimes we can use measurements in a schematic to infer measurements that are not listed. In this case, adding the yoke depth to the body length from underarm will result in the total body length.
How to Modify: As there is no body shaping, this is a very easy measurement to alter, simply knit it longer or shorter by adding or removing lice stitch repeats.
G: Sleeve Length - Similar to the body length, this is the length of the sleeve measured from the underarm. In a set-in sleeve this will usually not include the length of the sleeve cap.
How to Modify: To shorten the sleeve work fewer lice stitch repeats before the forearm, to lengthen work more lice stitch repeats. In a sleeve with a lot of shaping you’ll want to distribute the extra length evenly between the decrease rounds.
H: Cuff Circumference - This measurement allows you to see how much ease there will be at your wrist. Little Crystals has very wide cuffs.
How to Modify: See Sleeve Circumference. You’ll want all the changes to be made before the final cuff colorwork chart.
What if there is no schematic?
If you already own the pattern, and it doesn’t have a schematic (BOO!), you can do some sleuthing to find the measurements. You’ll need to find the stitch counts for the measurements you’re interested in, then use the gauge to convert those into measurements.