Bust Short Rows
I add them as an option to almost all my garment patterns. Horizontal bust darts add length but not width where they’re worked. Breast tissue usally protrudes from the chest, taking up vertical garment length. This causes the front hem to ride up, instead of the hem laying parallel to the ground all around. Bust shorts rows add that extra bit of needed length. I‘ve linked some blog posts below on why you might want to add them and how to determine their depth.
This blog post will look at their construction, and show what they look like in a few different types of garments to help visualize and demystify them.
Disclaimer: This is what I’ve found works for me and the knitters who work my patterns, it’s not the only way to calculate or work bust short rows. Some patterns call for two sets of short rows, a decreasing set followed by an increasing set, I’ve found a single set to be sufficient in most garments. My favorite type of short rows are German short rows, and that’s what I’m using as an example here.
Key Fit Points
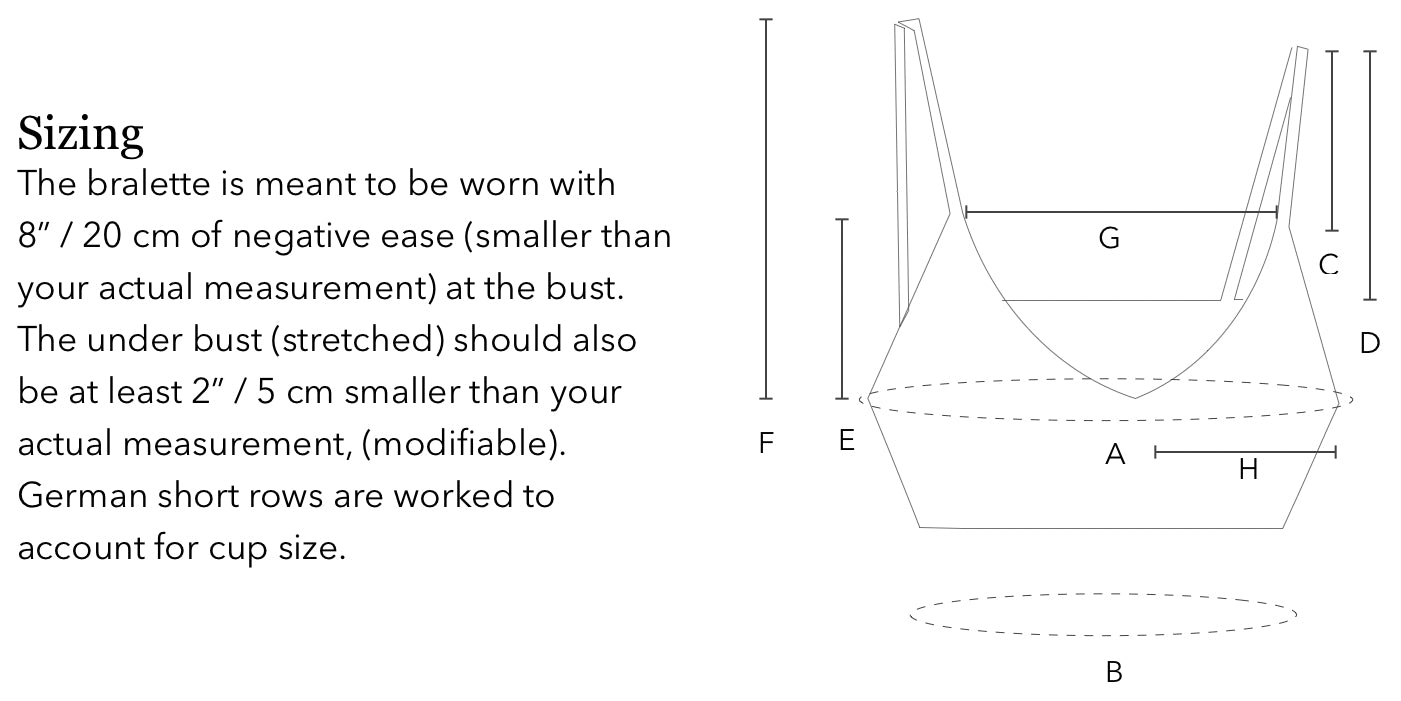
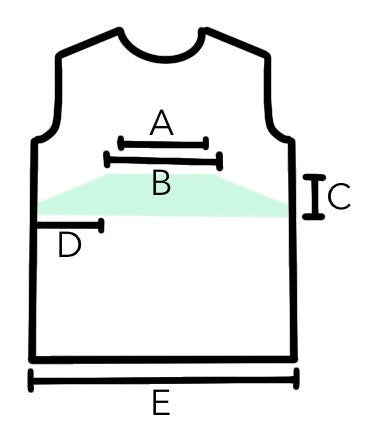
As you can see in the above diagram, bust short rows are often trapezoidal in shape. Whether you like to work them with the shortest row on the bottom or the top is personal preference. The bust dart will look like it’s pointing up towards the bust when the shortest row is on top, it will look like it’s pointing down if the shortest row is on the bottom. I’ve illustrated them as I like to work them. Let’s start by discussing key measurements that should be considered when adding bust short rows.
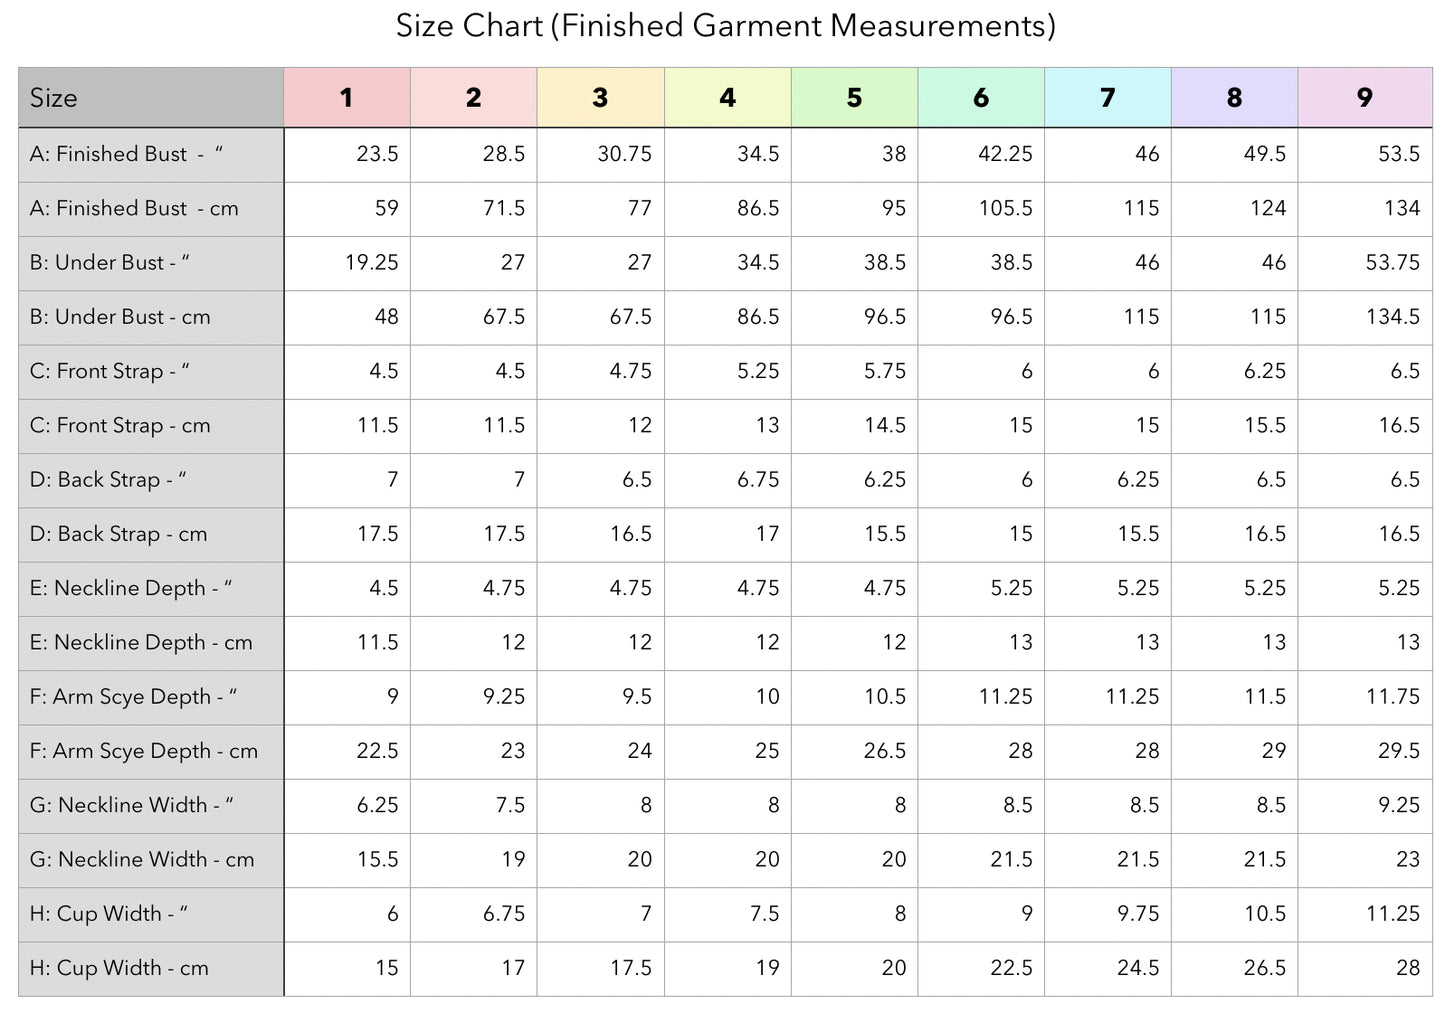
A: Apex to Apex (Nipple to Nipple)
This is a measurement that isn’t always found on size charts, I recommend googling bra or bikini size charts. If you can’t find any, I recommend measuring your own as a base for your size, and adding the grade used for the back neck measurement in your size chart to extrapolate the other sizes. It is not a distance that varies much across the size range. In my size chart it varies ~3” / 7.5 cm from the smallest to the largest size. This measurement is important because it helps you determine B.
B: Width of Shortest Short Row
We don’t want the bust dart to end right at the Apex, as it will result in a bit of a bullet bra effect. A good rule of thumb is to start the short rows ~1” / 2.5 cm away from each apex.
So A + 2” / 5 cm = B.
C: Short Row Depth
This is how much length you want to add to the center front. Most patterns that offer bust short rows will offer a range of cup sizes per size.
When you convert this into rows, round to the nearest even number. Short rows are worked in pairs, one right side and one wrong side row. If you are working a stitch pattern, and you want the stitch pattern to remain uninterrupted at the center front, you will need to round to the nearest row multiple of your stitch pattern. Note that this may limit the number of cup sizes that a pattern can offer.
D: Remaining Width to Work the Short Rows
This is the number of stitches on either side of B that you have to work the short rows. This number also limits how many short rows you are able to work. If you only have 10 stitches, you can only make 10 turns.
I use a formula for this after I’ve already converted the other measurements into stitches and rows.
(E - B) / 2 = D
E: Front Width
This is the length of the longest short row. Most articles and instructions will advise that the bust dart ends ~1” / 2.5 cm from the underarm. Most garments have stitches that are cast on or bound off at the underarm, I find those sufficient for keeping the bust darts away from the center of the underarm. I like the short rows to use all the front stitches, ending right before each underarm cast on / bind off.
F: Full Bust Height (not pictured in the diagram)
A common question is at what height to place the bust darts. I like to place them right at the full bust height, which is the point in the garment where the wearer’s bust reaches its fullest point. It is generally below the underarm (if the sweater has a very deep armscye measurement this may not be the case). In a top down garment I instruct the knitter to work the body until they reach their full bust height, and to then work the short rows.
Full bust height is a measurement that varies a lot even within each size, and that often changes as we age, which is why I prefer to write instructions this way. Some knitters prefer their bust short rows to be worked above their bust, and this way it’s an easy adjustment to make. Some patterns place the bust short rows for you, (E.g. work the short rows on row 89) I see this a lot in bottom up garments where it’s a bit harder to try it on to see where to put the darts.
A Closer Look at the Short Rows

Here’s what each trapezoid looks like when knitting, assuming that we’re working top down and that the shortest row is worked first. I’ve illustrated a total of 6 short row pairs (a total of 12 rows), the first is the set-up pair (the black dots illustrate the first 2 double stitches worked), and the following are where you’re working a certain number of stitches past each double stitch (DS).
Each pair is one right side row (right to left), and one wrong side row (left to right).
Calculations
Disclaimer: There are many ways of writing short row instructions. I’ll be referring to how I write German short row instructions, abbreviations include:
K- Knit, P- Purl, DS- Double Stitch, MDS- Make Double Stitch.
I use Numbers as my spreadsheet software, the formulas used may need to be adjusted to work in another software.
First Example:
Using the example above, C = 12 rows. Let’s say B = 20 stitches and E = 70 stitches.
(70 - 20) / 2 = 25 stitches = D
The first set-up row (assuming the round starts with the front stitches), would be to knit D + B = 25 + 20 = 45 stitches to get to the first black dot. For the second set up row, we start by making a DS, then purl B - 1 = 19 stitches. One is subtracted because the DS counts as the first stitch.
In the example, 12 rows are worked in total (C), 2 were worked in the set-up rows, so 10 rows remain (C - 2 = 10), a total of 5 turns on each side (10 / 2 = 5).
The next step is to calculate how many stitches to work past each double stitch to use up all of the D stitches. Sometimes this will result in all rows working the same number of stitches past each DS, but usually the calculations result in two rates, one slightly longer than the other.
Calculate the longer rate:
=ROUNDUP(D / number of turns, 0) = (25 / 5) = 5
The result is a whole number with no remainder, so all rows will be worked 5 stitches past the DS.
Calculate the shorter rate:
=ROUNDDOWN (D / number of turns, 0) = (25 / 5) = 5
In this case it’s the same as the longer rate, which means only one rate is needed. In this case, my instructions would read:
Short row 1 (RS): MDS, K to DS, K DS, K5, turn.
Short row 2 (WS): MDS, P to DS, P DS, P5, turn.
Work rows 1-2 a total of 5 times.
A total of 10 rows have been worked, not including the set-up rows, and all the front stitches have been used (5 x 5 on the left side and on the right side).
Second Example:
Let’s look at an example where the rates are different. Let’s say D was 23 instead, but keep the same number of turns (5).
The longer rate =ROUNDUP(23 / 5, 0) = 5 stitches
The shorter rate =ROUNDDOWN(23 / 5, 0) = 4 stitches
Next calculate how many times to work each rate.
The remainder tells you how many times to work the longer rate.
=MOD(D, number of turns) = MOD(23, 5) = 3 times
To find out how many times to work the shorter rate subtract the number of times you’re working the longer rate from the number of turns.
=5 - 3 = 2
Recently I’ve been placing the longer rate closest to the apex, and therefore working them first. I find this to create a rounder look, but you could work the shorter rate first, or alternate the two.
My instructions after the set-up would read something like this:
Short row 1 (RS): MDS, K to DS, K DS, K5 (longer rate), turn.
Short row 2 (WS): MDS, P to DS, P DS, P5 (longer rate), turn.
Work short rows 1-2 a total of 3 times.
Short row 3 (RS): MDS, K to DS, K DS, K4 (shorter rate), turn.
Short row 4 (WS): MDS, P to DS, P DS, P4 (shorter rate), turn.
Work short rows 3-4 a total of 2 times.
Short Rows in Cardigans
I don’t add bust short rows to open front cardigans because it’s unlikely that the fabric will be sitting above the bust, negating the need for the extra length. However, for cardigans that do button, the short rows are worked separately for each front. You can see in the illustration that you still get the same overall trapezoidal shape, but because the two fronts are not connected half the trapezoid is worked on the left front, and the other half on the right front.
Keep in mind that the buttonband also takes up room, make sure to include it in your B and E measurements when calculating D.
Left Front: I’ve illustrated the path of the short rows on the left front. Notice that while the short rows get longer on the underarm side of the front, they don’t on the buttonband side.
The set-up is calculated slightly differently. Let’s say the buttonband occupies the same space as 6 stitches. The first short row would need to be (B - 6) / 2 stitches. Using the same numbers as before (20 - 6) / 2 = 7 stitches. The set-up instructions would read:
Set-up row 1 (RS): K7, turn.
Set-up row 2 (WS): MDS, P to EOR, turn.
Assuming D is the same as our orignal example, after the set-up the instructions would read:
Short row 1 (RS): K to DS, K DS, K5, turn.
Short row 2 (WS): MDS, P to EOR, turn.
Once you finish the short rows on one of the fronts you’ll work across the back and then start working the short rows on the other front.
If you’d like to see how this looks in a project, check out the project pages on Ravelry for the Malinois Cardigan, I didn’t add any short rows in my sample, but several test knitters did.
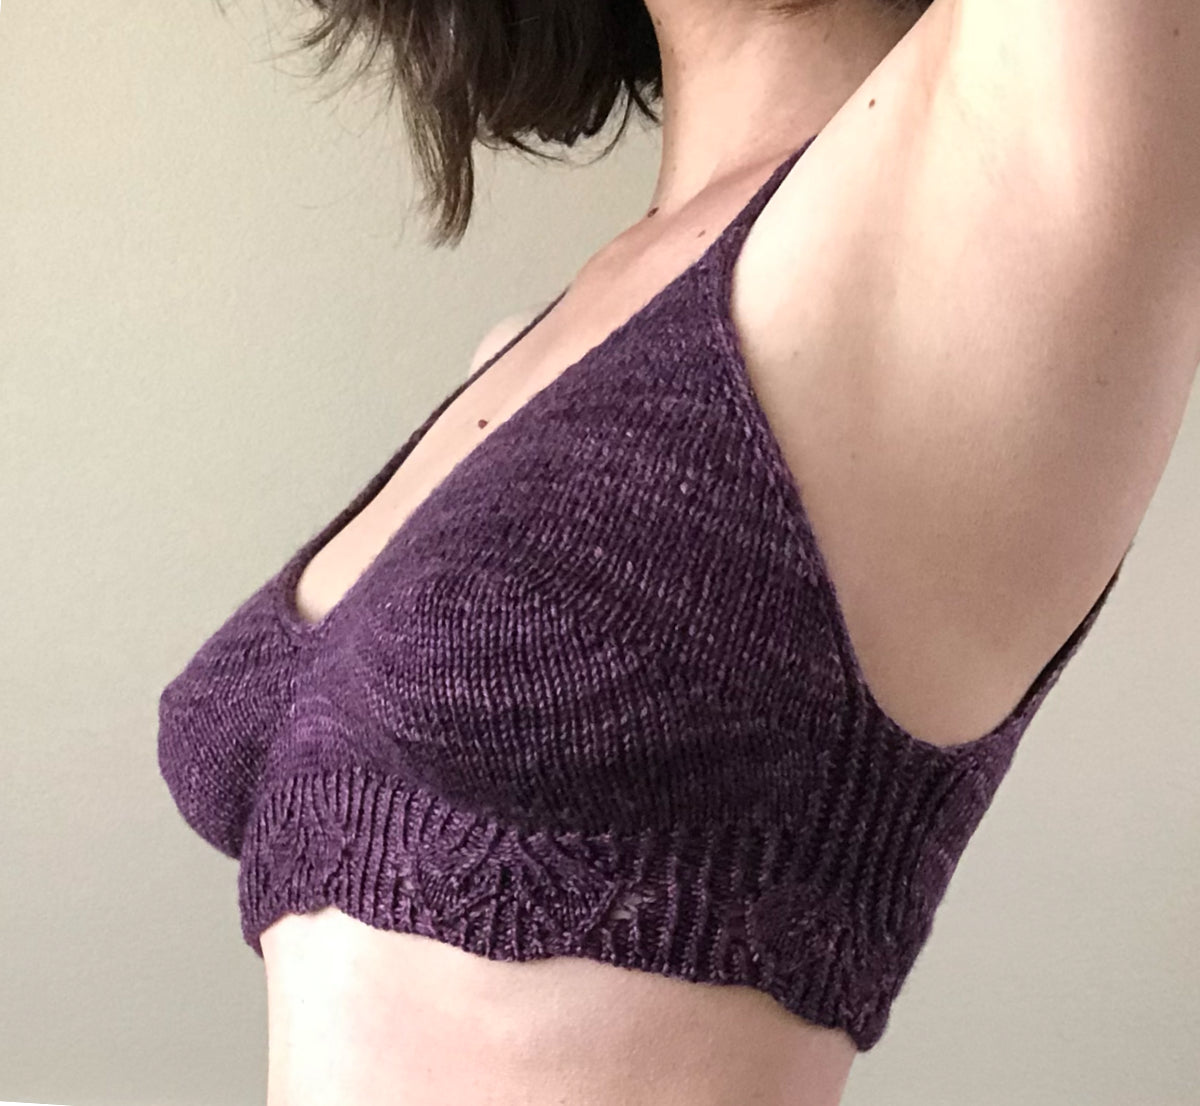
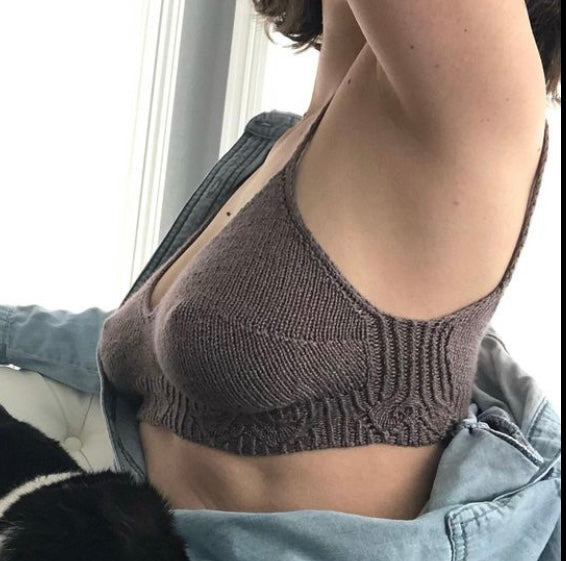
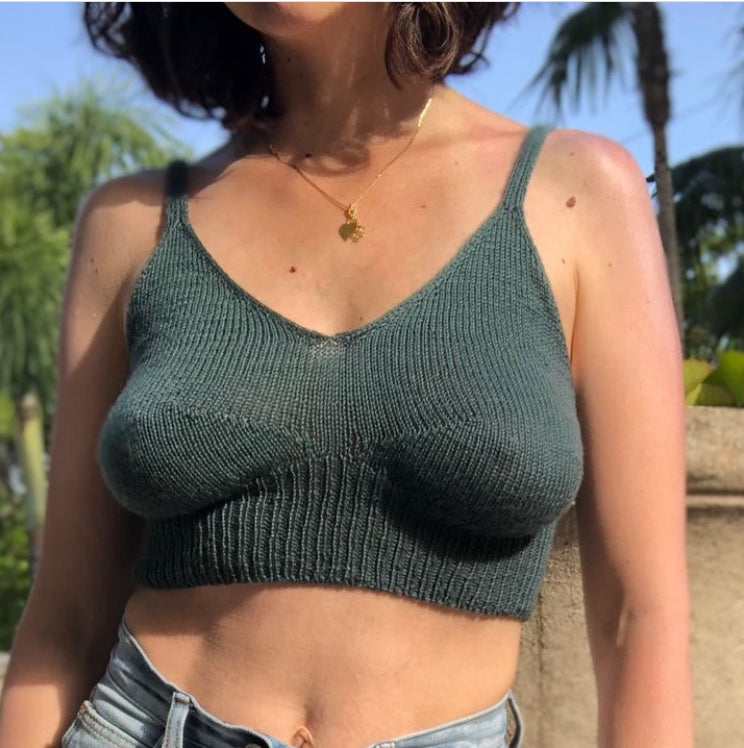
Individual Cup Shaping
This is what sets the Nurture Bralette apart from many other bralette patterns. Rather than one large trapezoid for both breasts it features independent cup shaping. This allows the cups to be different sizes for each breast. It also encourages fabric to hug each breast, as it creates a dip between them, much like a bra with two cups.
You’ll work the short rows one cup at a time. A is still a very important measurement, but now the buffer needs to be added to both sides of each apex, not just the underarm side. In my experience, the shortest short row (B) is ideally at least 2” / 5 cm wide, and is centered around each apex.
While you can make the trapezoid symmetrical, it’s not unusual to have more stitches to work with on the underarm side, and fewer between the breasts. The turns need to be calculated separately with however many stitches there are between the shortest row and where the short rows end at the center front.
Note that this type of short row construction can cause the center front of the hem to ride up between the cups, as no extra length was added there. You can counteract this with a small trapezoid of short rows worked at the center front after both cups have been finished (the Speedy Racerback Bralette offers this as a modification). At this point you might think that it’s the same as just working one large trapezoid, but the valley created between the cups remains. It’s worth the extra effort to follow the body’s contours.
If you’d like to see some project pages to see how individual cup shaping looks, check out the Nurture Bralette and Speedy Racerback Bralette project pages on Ravelry.